背景
社会のデジタル化が加速する中、企業においてデータ分析に対する需要はますます高まっています。データ処理では、主に大量の履歴データを処理するオフラインシナリオに重点が置かれており、これはデータウェアハウスを構築することで解決することができます。OceanBaseは、データウェアハウスを構築することで、オフラインデータの分析に関する課題を解決することができます。スケジュールタスクを通じて、オペレーショナルデータストア(ODS)からデータウェアハウス詳細(DWD)、そして最終的にアプリケーションデータサービス(ADS)に至るデータ階層を構築し、OceanBaseに基づくデータウェアハウスを作成します。同時に、関連エコシステムツールを用いて可視化ダッシュボードを構築することも可能です。
前提条件
ご使用のソースデータベースがMySQLであるか、あるいはOceanBase V4.3.3以降のバージョンのクラスタがデプロイ済みであり、かつMySQLMySQLモードのテナントが作成済みであること。OceanBaseクラスタのデプロイに関する詳細は、デプロイの概要を参照してください。
作成したMySQLモードのテナントに挿入とクエリを実行する権限が付与されていること。権限設定の詳細については、直接権限の付与を参照してください。
データベースを作成済みであること。データベースの作成に関する詳細については、データベースの作成を参照してください。
ご使用のソースデータベースでBinlogサービスが有効化されていること。
Flink、CDC、DBT、airflow、Grafanaをデプロイ済みであること。
準備作業
データベースの作成とテーブルの作成
ソースデータベースをTPデータベース、ターゲットデータベースをAPデータベースとし、それぞれにtptestデータベースとaptestデータベースを作成します。
create database aptest;create database tptest;TPデータベースとAPデータベースのそれぞれにテーブルを作成します。テーブル作成のステートメントは以下のとおりです。
CREATE TABLE `orders` ( order_id bigint not null primary key, user_id varchar(50) not null, shop_id bigint not null, product_id bigint not null, buy_fee numeric(20,2) not null, create_time timestamp not null, update_time timestamp not null default now(), state int not null ); CREATE TABLE `orders_pay` ( pay_id bigint not null primary key, order_id bigint not null, pay_platform varchar(64) not null, create_time timestamp not null ); CREATE TABLE `product_catalog` ( product_id bigint not null primary key, catalog_name varchar(50) not null );TPデータベース内のテーブルにいくつかデータを挿入します。
INSERT INTO product_catalog VALUES(1, 'iphone 14'),(2, 'iphone 14 pro max'),(3, 'iphone 15'),(4, 'huawei mate 60'),(5, 'huawei pura 70'); insert into `tptest`.`orders_pay`(`pay_id`,`order_id`,`pay_platform`,`create_time`) values(1,1,'test','2024-10-01 00:00:00'); insert into `tptest`.`orders_pay`(`pay_id`,`order_id`,`pay_platform`,`create_time`) values(2,2,'test','2024-10-02 00:00:00'); insert into `tptest`.`orders_pay`(`pay_id`,`order_id`,`pay_platform`,`create_time`) values(3,3,'test','2024-10-03 00:00:00'); insert into `tptest`.`orders_pay`(`pay_id`,`order_id`,`pay_platform`,`create_time`) values(4,4,'test','2024-10-04 00:00:00'); insert into `tptest`.`orders_pay`(`pay_id`,`order_id`,`pay_platform`,`create_time`) values(1,1,'test','2024-10-01 00:00:00'); insert into `tptest`.`orders_pay`(`pay_id`,`order_id`,`pay_platform`,`create_time`) values(2,2,'test','2024-10-02 00:00:00'); insert into `tptest`.`orders_pay`(`pay_id`,`order_id`,`pay_platform`,`create_time`) values(3,3,'test','2024-10-03 00:00:00'); insert into `tptest`.`orders_pay`(`pay_id`,`order_id`,`pay_platform`,`create_time`) values(4,4,'test','2024-10-04 00:00:00');
Flink同期リンクの構築
Flink CDCを起動した後、Flinkデプロイフォルダに進み、./bin/sql-client.sh コマンドを実行し、Flink SQLインターフェースを開きます。次のSQLを順に実行します。
```sql
CREATE TABLE mysql_orders (
order_id bigint not null primary key NOT ENFORCED,
user_id varchar(50) not null,
shop_id bigint not null,
product_id bigint not null,
buy_fee numeric(20,2) not null,
create_time timestamp not null,
update_time timestamp not null,
state int not null
)WITH (
'connector' = 'mysql-cdc',
'hostname' = 'xxx.xxx.xxx.xxx',
'port' = '3306',
'username' = 'wktest',
'password' = '******',
'database-name' = 'tptest',
'table-name' = 'orders');
CREATE TABLE `mysql_orders_pay` (
pay_id bigint not null primary key NOT ENFORCED,
order_id bigint not null,
pay_platform varchar(64) not null,
create_time timestamp not null
) WITH (
'connector' = 'mysql-cdc',
'hostname' = 'xxx.xxx.xxx.xxx',
'port' = '3306',
'username' = 'wktest',
'password' = '******',
'database-name' = 'tptest',
'table-name' = 'orders_pay');
CREATE TABLE `mysql_product_catalog` (
product_id bigint not null primary key NOT ENFORCED,
catalog_name varchar(50) not null
) WITH (
'connector' = 'mysql-cdc',
'hostname' = 'xxx.xxx.xxx.xxx',
'port' = '3306',
'username' = 'wktest',
'password' = '******',
'database-name' = 'tptest',
'table-name' = 'product_catalog');
CREATE TABLE `orders` (
order_id bigint not null primary key NOT ENFORCED,
user_id varchar(50) not null,
shop_id bigint not null,
product_id bigint not null,
buy_fee numeric(20,2) not null,
create_time timestamp not null,
update_time timestamp not null,
state int not null
) WITH (
'connector' = 'jdbc',
'url' = 'jdbc:mysql://******:3306/aptest',
'username' = 'wktest@mysql001',
'password' = '******',
'table-name' = 'orders');
CREATE TABLE `orders_pay` (
pay_id bigint not null primary key NOT ENFORCED,
order_id bigint not null,
pay_platform varchar(64) not null,
create_time timestamp not null
) WITH (
'connector' = 'jdbc',
'url' = 'jdbc:mysql://******:3306/aptest',
'username' = 'wktest@mysql001',
'password' = '******',
'table-name' = 'orders_pay');
CREATE TABLE `product_catalog` (
product_id bigint not null primary key NOT ENFORCED,
catalog_name varchar(50) not null
) WITH (
'connector' = 'jdbc',
'url' = 'jdbc:mysql://******:3306/aptest',
'username' = 'wktest@mysql001',
'password' = '******',
'table-name' = 'product_catalog',
'sink.buffer-flush.max-rows' = '0',
'sink.buffer-flush.interval' = '0');
INSERT INTO product_catalog SELECT * FROM mysql_product_catalog;
INSERT INTO orders_pay SELECT * FROM mysql_orders_pay;
INSERT INTO orders SELECT * FROM mysql_orders;
```
上記のFlink CDC同期リンクを作成すると、データはリアルタイムで tptestデータベースから aptestデータベースに同期されます。SQLコンソールから、対応するテーブルデータを確認することができます。
コンピューティング層の構築
DBTプロジェクトの構築
元のTPテーブル構造は、直接データ分析や表示に利用するには適しておらず、何らかの変換を必要とします。ここでは、DBTプロジェクトを使用してデータを変換します。Demoの元のサンプルに基づいてDBTプロジェクトを構築し、モデルを定義します。手順の詳細は以下のとおりです。
DBTをインストールしデプロイした後、
dbt init my_projectを実行し、my_projectという名前のDBTプロジェクトを作成します。表示されるダイアログボックスで、ヒントに従ってデータベース情報を入力します。ここで注意が必要な点は、userにはユーザー名のみを入力することです。作成後、上記で入力した情報がファイル~/.dbt/profiles.ymlに記録され、データベースの接続に使用されます。cd my_projectを実行してプロジェクトディレクトリに移動します。/my_project/models/exampleディレクトリ内にSQLファイルを作成し、データモデルを定義します。# models/example/dwd_orders.sql {{ config( materialized='view') }} select o.order_id as order_id, o.user_id as order_user_id, o.shop_id as order_shop_id, o.product_id as order_product_id, o.buy_fee as order_fee, o.create_time as order_create_time, o.update_time as order_update_time, o.state as order_state, c.catalog_name as order_product_catalog_name, p.pay_id as pay_id, p.pay_platform as pay_platform, p.create_time as pay_create_time from orders o left join product_catalog c on o.product_id = c.product_id left join orders_pay p on o.order_id = p.order_id# models/example/dwd_shops.sql {{ config(materialized='table') }} select order_shop_id, str_to_date(date_format(pay_create_time, '%Y%m%d'), '%Y%m%d') as ds, sum(order_fee) as sum_fee from {{ ref('dwd_orders') }} where order_state=1 GROUP BY order_shop_id, date_format(pay_create_time, '%Y%m%d')# models/example/dwd_shops_all.sql {{ config(materialized='table') }} select str_to_date(date_format(pay_create_time, '%Y%m%d'), '%Y%m%d') as ds, sum(order_fee) as sum_fee from {{ ref('dwd_orders') }} where order_state=1 GROUP BY date_format(pay_create_time, '%Y%m%d')# models/example/dwd_users.sql {{ config(materialized='table') }} select order_user_id, str_to_date(concat(date_format(pay_create_time, '%Y%m'), '01'), '%Y%m%d') as ds, sum(order_fee) as sum_fee from {{ ref('dwd_orders') }} where order_state = 1 group by order_user_id, date_format(pay_create_time, '%Y%m')dbt compileを実行し、モデルをコンパイルすることでSQLをデータベース固有のステートメントに変換します。dbt runを実行し、すべてのモデルを実行します。
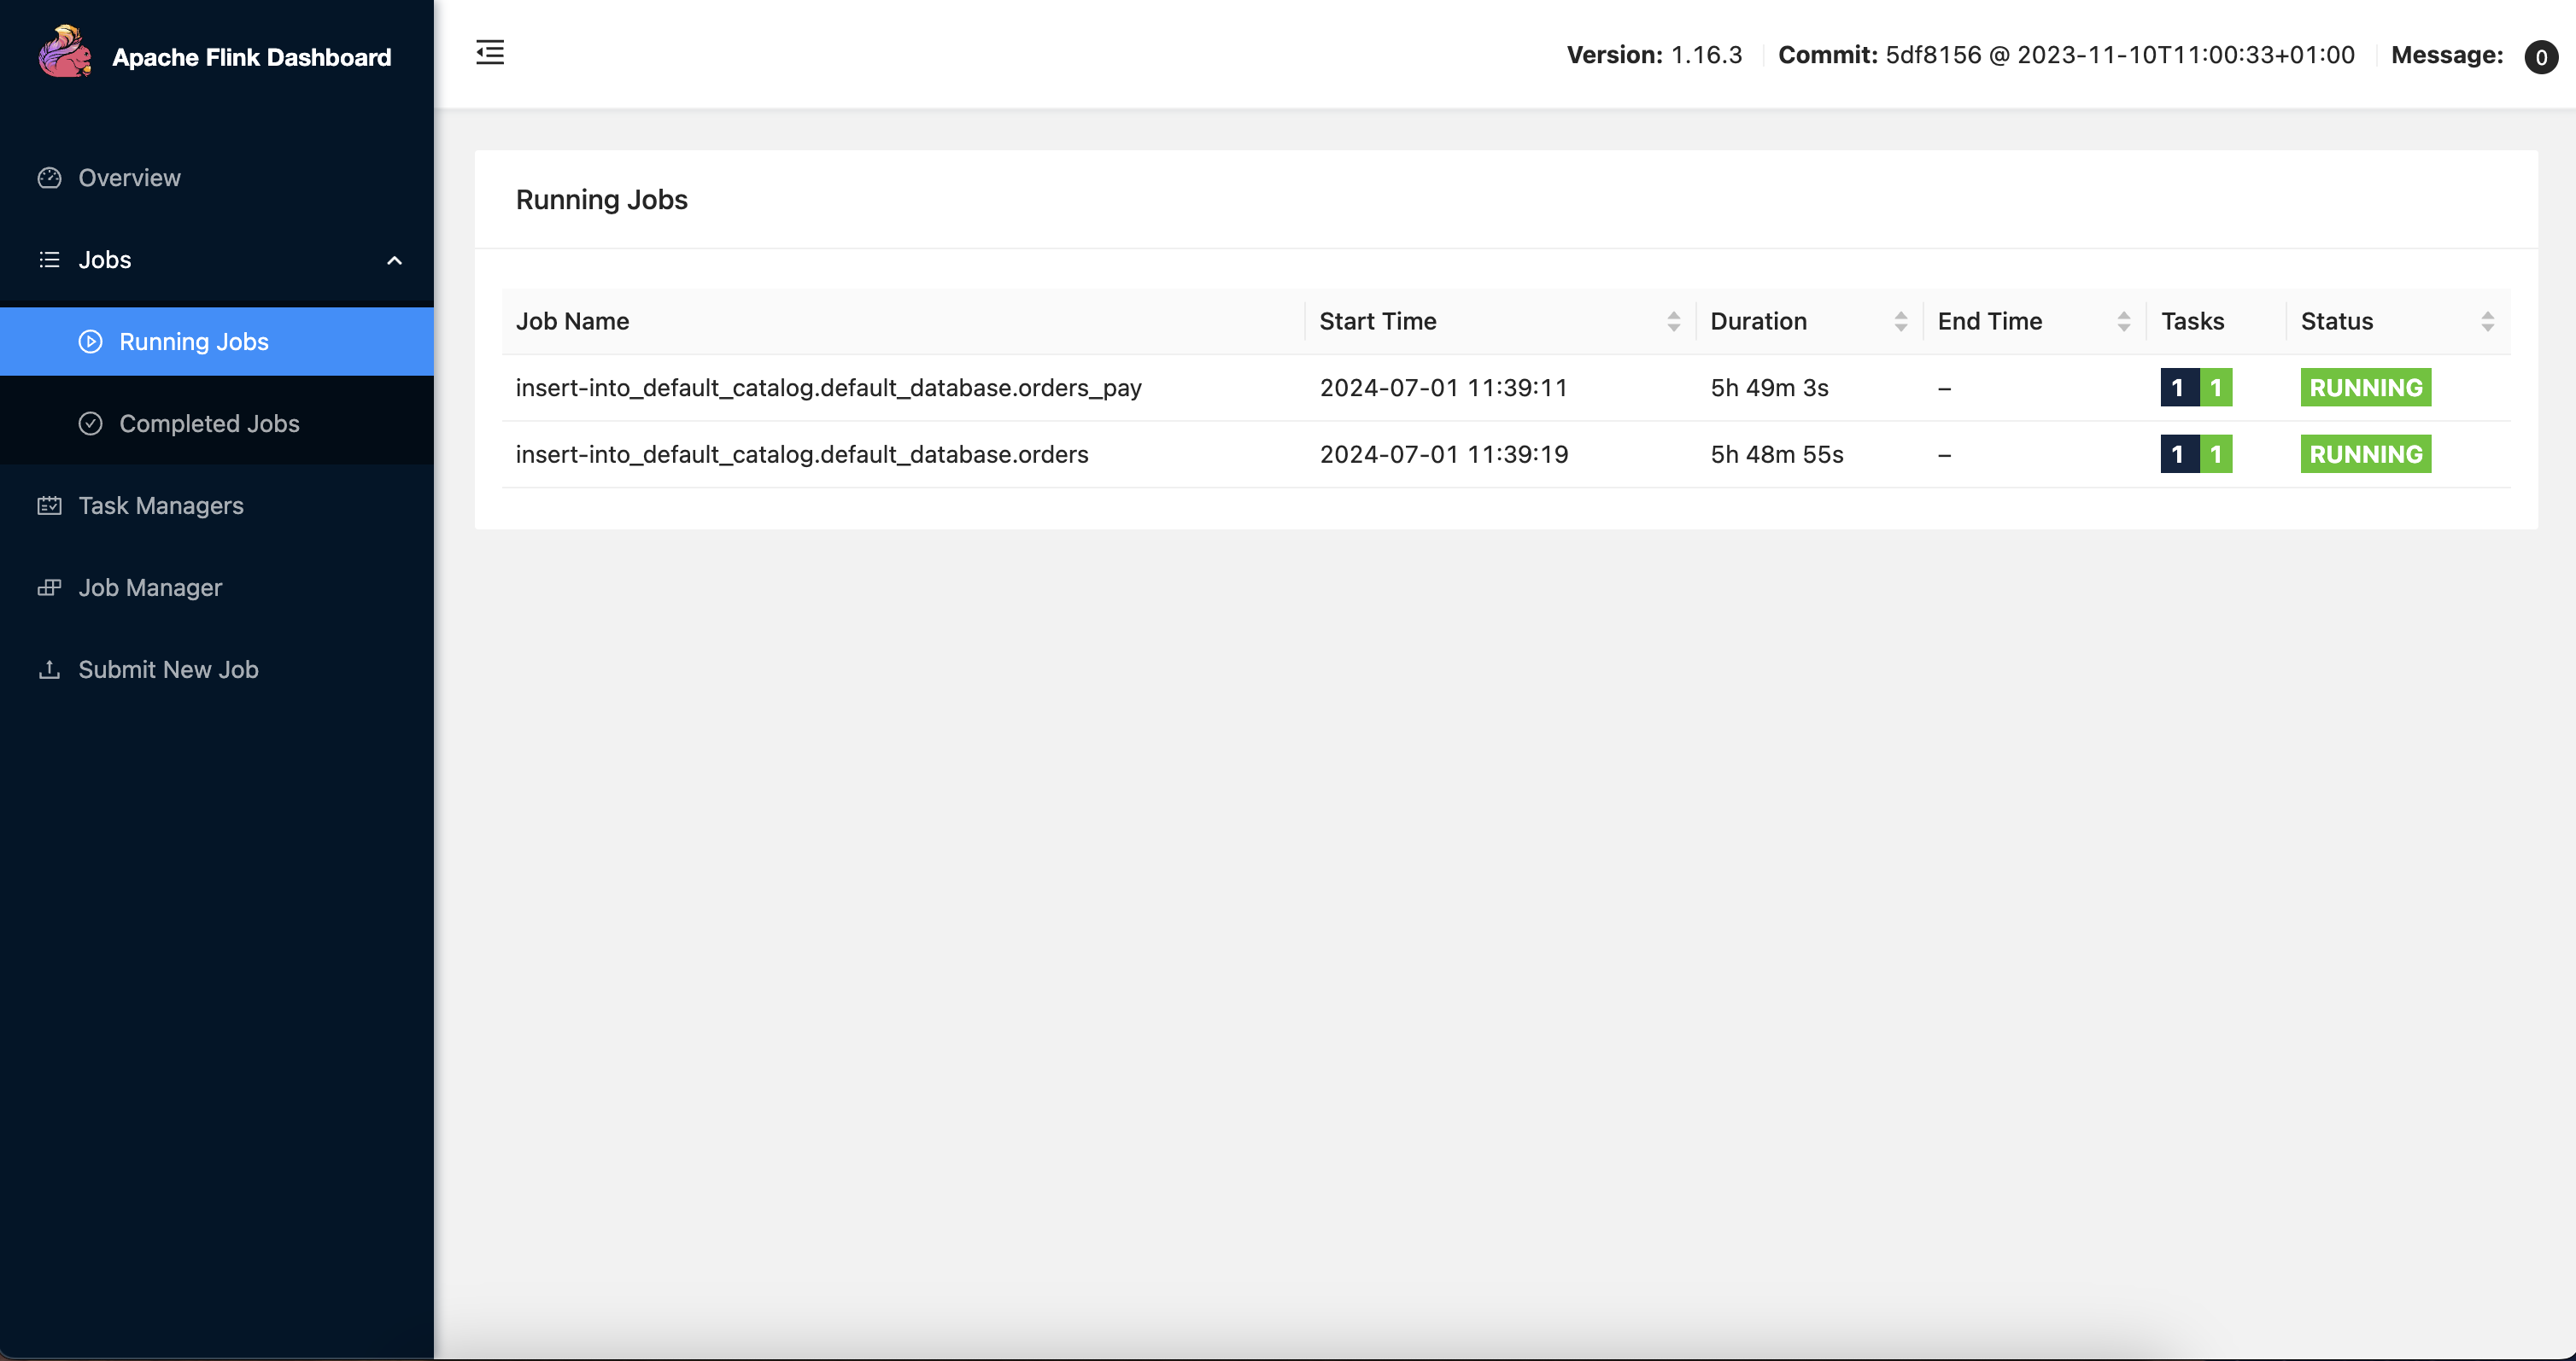
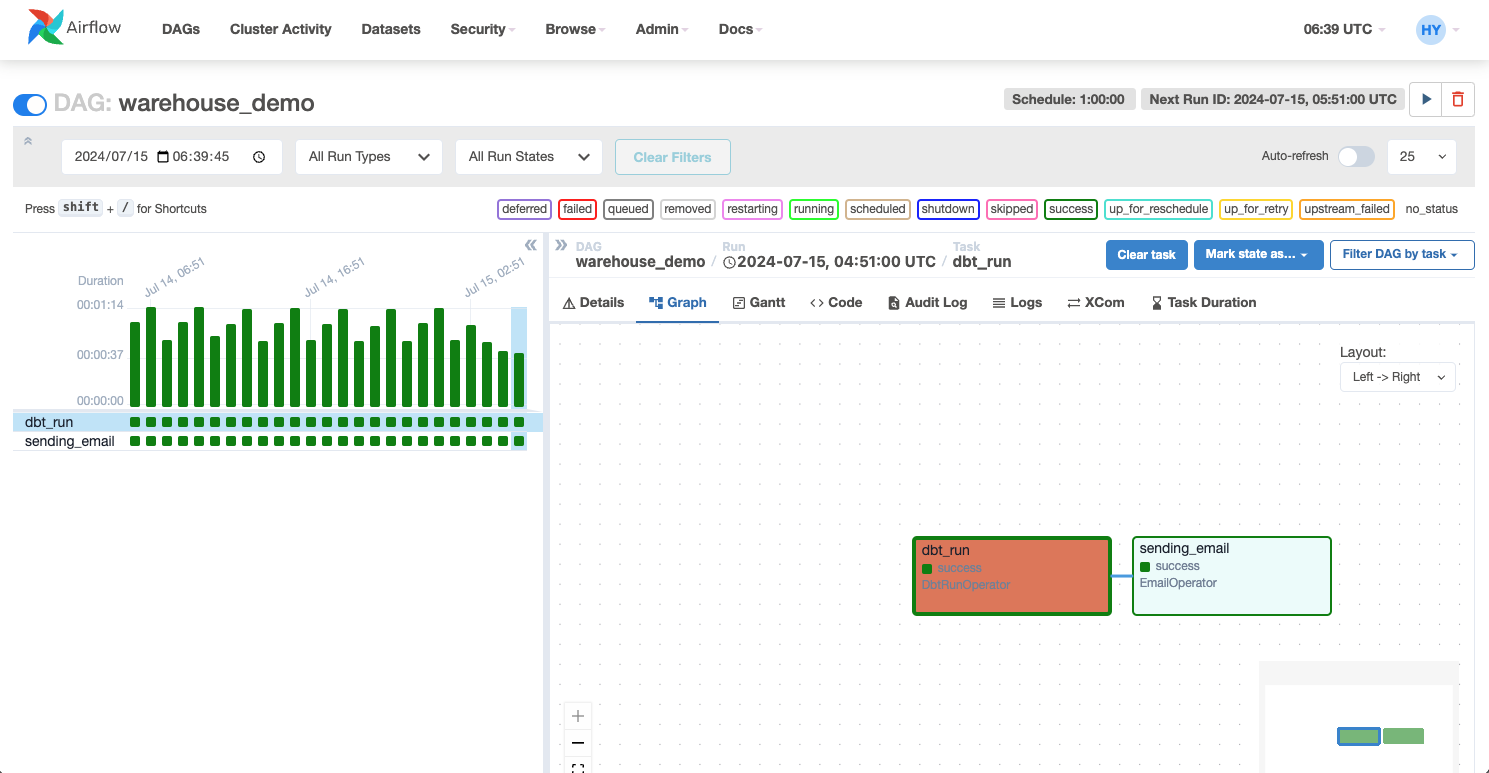
DAGスケジュールタスクの作成
ここでは、Airflowを基本的なDAGおよびスケジューリングプラットフォームとして採用します。初回インストールとデプロイの後、airflow db init を実行してAirflowのデータベースを初期化する必要があります。Airflowをデプロイした後、airflow scheduler を実行しSchedulerを起動すると、DAGのリアルタイムスケジューリングができるようになります。airflow webserver を実行し、Webサーバーを起動すると、Webインターフェース上でスケジュールタスク全体をすべて確認できます。
アクセスするデータベースの設定完了後、バックグラウンドからAirflowをデプロイしたマシンにログインし、DAGファイル(.pyファイル)をAirflowの dags ディレクトリに配置すると、AirflowはDAGを自動的に検出して読み込みます。ここでは、2つのコンピューティングノードを定義します。1つはDBTプロジェクトを実行し、データウェアハウスのコンピューティングタスクを完了するために使用されます。もう1つはコンピューティングタスクの完了後、ユーザーにメール通知を送信するために使用されます。DAGは以下のように定義されます。
# Copyright (c) 2023 OceanBase.
#
# Licensed under the Apache License, Version 2.0 (the "License");
# you may not use this file except in compliance with the License.
# You may obtain a copy of the License at
#
# http://www.apache.org/licenses/LICENSE-2.0
#
# Unless required by applicable law or agreed to in writing, software
# distributed under the License is distributed on an "AS IS" BASIS,
# WITHOUT WARRANTIES OR CONDITIONS OF ANY KIND, either express or implied.
# See the License for the specific language governing permissions and
# limitations under the License.
from datetime import datetime, timedelta
from airflow import DAG
from airflow.operators.email import EmailOperator
from airflow_dbt import DbtRunOperator
default_args = {
"owner": "airflow",
"depends_on_past": False,
"start_date": datetime(2024, 7, 12, 8, 35),
"email": ["******@oceanbase.com"],
"email_on_failure": True,
"email_on_retry": False,
"retries": 1,
"retry_delay": timedelta(minutes=5),
}
dag = DAG("warehouse_demo", default_args=default_args, schedule=timedelta(minutes=1))
t4 = EmailOperator(
task_id="sending_email",
to="******@oceanbase.com",
subject="AirFlow Notice",
html_content="<h1>Your Airflow Has been completed</h1>",
dag=dag,
)
dbt_operator = DbtRunOperator(
task_id="dbt_run", dir="xxx", dag=dag
)
dbt_operator >> t4
上記ファイルをデプロイすると、AirflowのWebインターフェース上で、スケジュールタスク全体が完全に表示されます。必要に応じて、このタスクをスケジュールすることができます。
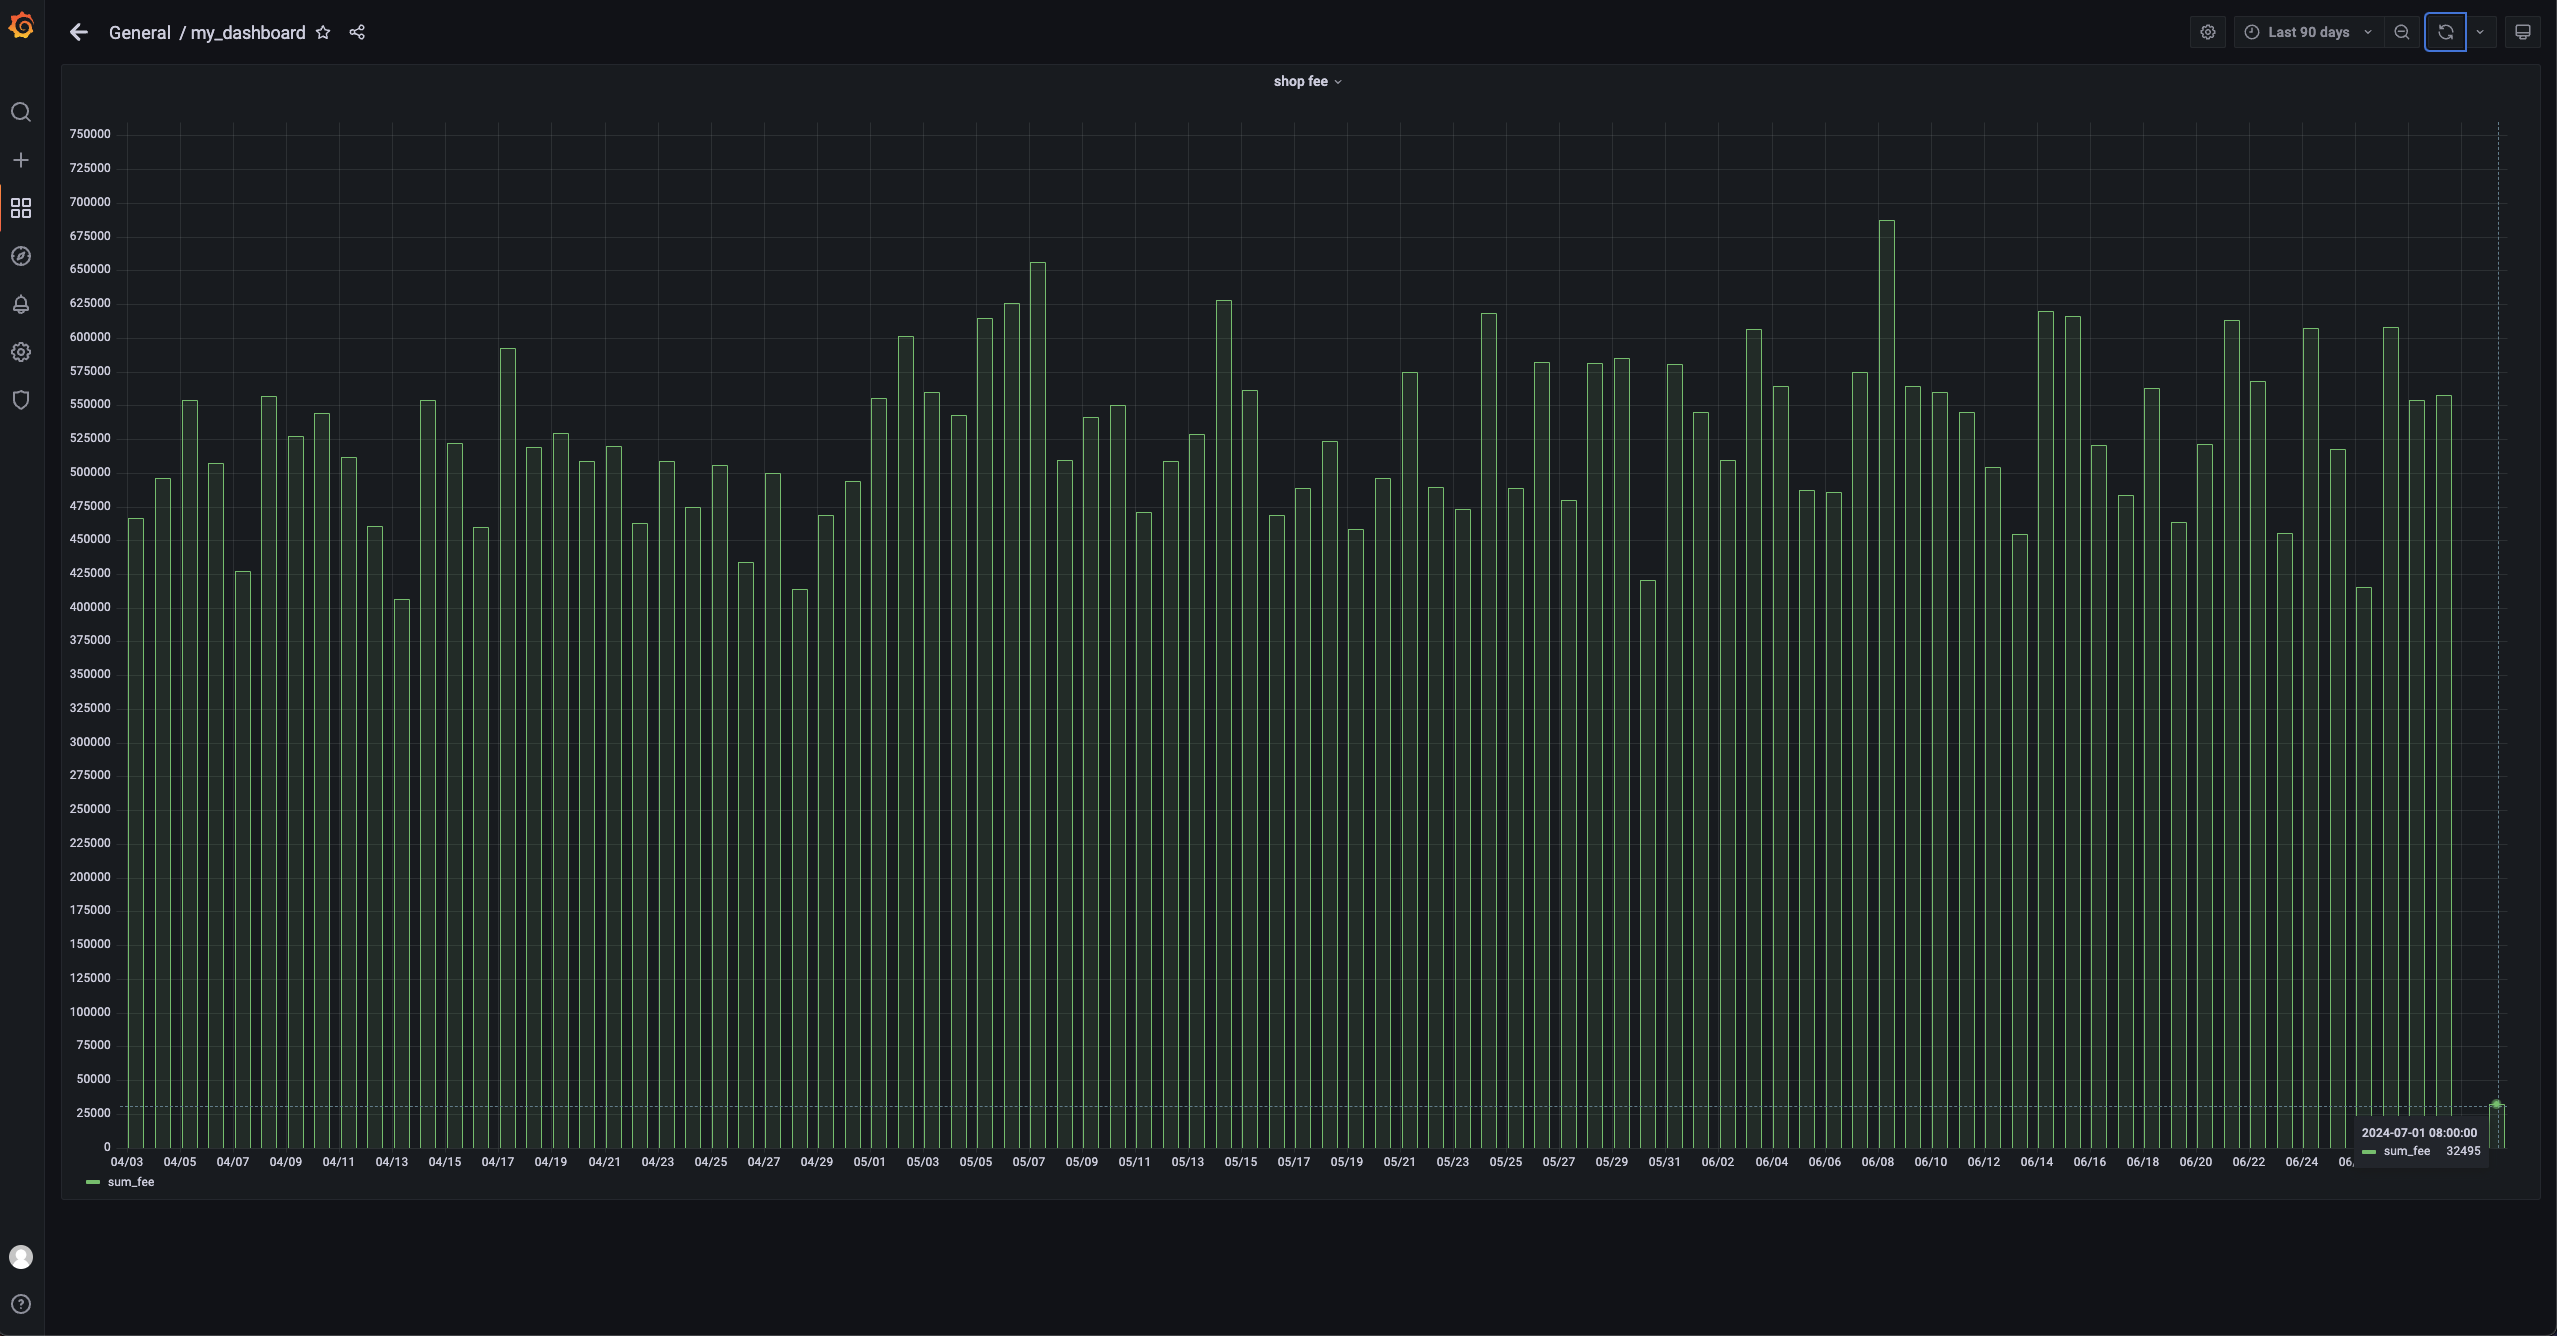
Grafanaダッシュボードの設定
ここでは、店舗の1日あたりの売上額のみが表示されています。そのうちの1店舗の売上額と全店舗の売上額だけに注目します。そのため、GrafanaでAPライブラリへの接続を設定し、対応するSQLをグラフィカルに表示されます。SQLは以下のように記述されます。
```sql
SELECT
ds AS "time",
sum_fee AS "sum_fee"
FROM dwd_shops
WHERE
order_shop_id = 35
ORDER BY ds
```
実装
購買行動のシミュレーション
ユーザーの購買行動をシミュレートする簡単なPythonスクリプト test.py を作成します。
# Copyright (c) 2023 OceanBase.
#
# Licensed under the Apache License, Version 2.0 (the "License");
# you may not use this file except in compliance with the License.
# You may obtain a copy of the License at
#
# http://www.apache.org/licenses/LICENSE-2.0
#
# Unless required by applicable law or agreed to in writing, software
# distributed under the License is distributed on an "AS IS" BASIS,
# WITHOUT WARRANTIES OR CONDITIONS OF ANY KIND, either express or implied.
# See the License for the specific language governing permissions and
# limitations under the License.
import dataclasses
from typing import Dict
import mysql.connector
PRODUCT_ID_2_FEE: Dict[int, float] = {
1: 5399,
2: 10099,
3: 4599,
4: 5499,
5: 6499,
}
@dataclasses.dataclass
class Phone:
product_id: int
catalog_name: str
buy_fee: float
def get_max_order_id(cur):
cur.execute("select order_id from orders order by order_id desc limit 1")
id = cur.fetchone()
return next(iter(id))
def get_max_pay_id(cur):
cur.execute("select pay_id from orders_pay order by pay_id desc limit 1")
id = cur.fetchone()
return next(iter(id))
def buy_phone(product_id: int, cursor, user_id=15, shop_id=35):
cursor.execute("select product_id, catalog_name from product_catalog")
tuples = cursor.fetchall()
phones = [
Phone(
**{
"product_id": p_id,
"catalog_name": c_name,
"buy_fee": PRODUCT_ID_2_FEE.get(p_id),
}
)
for p_id, c_name in tuples
]
target = next(filter(lambda p: p.product_id == product_id, phones))
order_id = get_max_order_id(cursor) + 1
sql = f"insert into `orders`(`order_id`, `user_id`, `shop_id`, `product_id`, `buy_fee`, `create_time`, `update_time`, `state`) values({order_id}, {user_id}, {shop_id}, {product_id}, {target.buy_fee}, now(), now(), 0)"
cursor.execute(sql)
pay_id = get_max_pay_id(cursor) + 1
sql = f"insert into `orders_pay`(`pay_id`, `order_id`, `pay_platform`, `create_time`) values({pay_id}, {order_id}, 'Alipay', now())"
cursor.execute(sql)
sql = f"update orders set state=1 where order_id={order_id}"
cursor.execute(sql)
cursor.execute("commit")
print(target)
if __name__ == "__main__":
with mysql.connector.connect(
**{
"host": "******",
"port": "3306",
"database": "tptest",
"user": "wktest@mysql001",
}
) as conn:
with conn.cursor() as cursor:
buy_phone(5, cursor)
sh python.py コマンドを実行して、このスクリプトを実行します。
Airflowのスケジューリング
1分間経過すると、Airflowは事前に設定されたDAGをスケジュールします。Webインターフェース上のステータスでノードの実行状態を判断することができ、同時にタスクのログを表示することもできます。
データダッシュボードの表示
データダッシュボードから、最新のデータを見ることができます。ここでは、店舗の1日あたりの売上額のみが表示されています。そのうちの1店舗の売上額と全店舗の売上額だけに注目すると、7月1日の売上額は32,495になっていることが分かります。